Category: Video Art

  • Survey of Alternative Displays

    lightbeam

    Read this article online here

    Here is a link to the full PDF of my Survey of Alternative Displays:

    ::::::::::: Survey_of_Alternative_Displays_0919a.pdf (5662 downloads )


    (Some formatting got altered when exporting to PDF and links were lost on image captions – here is the docx version as an alternative: Alt_Displays_Formatted_Rough_v6_Final.docx (7100 downloads ) – document formatting is a nightmare)

    Please share, use for teaching, whatever you need – I made this as a resource for others. I’m hoping this helps continue the trend of finding new ways to work with light and information.  Would be great to be credited where appropriate.

    Here are some of the other things I’ve written along these lines that you may find helpful:

    How to keep an Installation up forever

    Guide to Projectors for Interactive Installations

    Guide to Cameras for Interactive Installations


  • Applescript to automatically fullscreen Madmapper for installations

    This is a simple Applescript that I used with a long running installation that required Madmapper for doing some precise mapping. More info on keeping long running installations going is here: http://blairneal.com/blog/installation-up-4evr/

    This script would be used on reboot to both open your Syphon enabled app and to open your madmapper file, open it, select fullscreen, and then hit OK on the dialog box.

    It requires you to set your own file path in the script for your madmapper file and application file.

    To use the code below:

    1. Open Applescript and paste it into a new file

    2. Change the filepaths and resolution so they match how it appears in your setup (ie resolution may be 3840×720 instead)

    2. Go to “File -> Export” and select “Application” as your file format

    3. In System Preferences -> Users & Groups -> Login items drop your applescript application in there to automatically launch on boot


    You can also add in pauses (for things to load) and other checks with applescript if necessary.

    This script will fail if for some reason the resolution has changed on boot or something – if the text doesn’t match exactly how it is in the Output menu of madmapper, it won’t work.

    NOTE: I personally do not recommend using Madmapper for long running installations – there are occasional issues with it losing keyboard focus and it can appear as if your machine has locked you out if accessing it remotely. It’s also typically best practice to try and keep everything simplified into one application so you can minimize weird occurrences. In the case that we had to use this, there was not enough development time to add in the mapping code that was necessary.


    tell application "Finder" to open POSIX file "YourInstallationApp.app" --add your absolute file path to your application
    
    delay 10 --wait 5 seconds while your app loads up
    
    tell application "Finder" to open POSIX file "/Users/you/yourmadmapperfile.map" --absolute filepath to your madmapper file
    
    do_menu("MadMapper", "Output", "Fullscreen On Mainscreen: 1920x1200") --change this line to your determined resolution
    
    on do_menu(app_name, menu_name, menu_item)
    	try
    		-- bring the target application to the front
    		tell application app_name
    			activate
    		end tell
    		delay 3 --wait for it to open
    		tell application "System Events"
    			tell process app_name
    				tell menu bar 1
    					tell menu bar item menu_name
    						tell menu menu_name
    							click menu item menu_item
    							delay 3 --wait for Is fullscreen OK? box to appear
    							tell application "System Events" to keystroke return
    						end tell
    					end tell
    				end tell
    			end tell
    		end tell
    
    		return true
    	on error error_message
    		return false
    	end try
    end do_menu
  • The Biggest Optical Feedback Loop in the World (Revisited)

    Optical feedback is a classic visual effect that results when an image capture device (a camera) is pointed at a screen that is displaying the camera’s output. This can create an image that looks like cellular automata/reaction-diffusion or fractals and can also serve as a method of image degradation through recursion.

    Many video artists have used this technique to create swirling patterns as a basis for abstract videos, installations and music videos. Feedback can also be created digitally by various means including continually reading and drawing textures in a frame buffer object (FBO) but the concept is essentially the same. In this post I’m writing up a thought experiment for a project that would create the biggest optical feedback loop in the world.

    Sample of analog video feedback:

    Optical Feedback Loop from Adam Lucas on Vimeo.

    Sample of video feedback (digital rendering from software):

    I really enjoy the various forms of this effect from immediate feedback loops to “slower” processes like image degradation. Years ago, I did a few projects involving video feedback and image degradation via transmission, and this thought experiment combines those two interests. Lately, I’ve also been obsessed with really unnecessarily excessive, Rube Goldberg-like uses of technology, and this fits that interest pretty well. It’s like playing a giant game of Telephone with video signals.

    While in residency at the Experimental Television Center in 2010, I was surrounded by cameras, monitors and 64 channel video routers. After a few sessions with playing with feedback on the Wobbulator, I drew up a sketch for making a large video feedback loop using all of the possible equipment in the lab…and a Skype feed for good measure. Here is that original sketch:

    sketch_mod


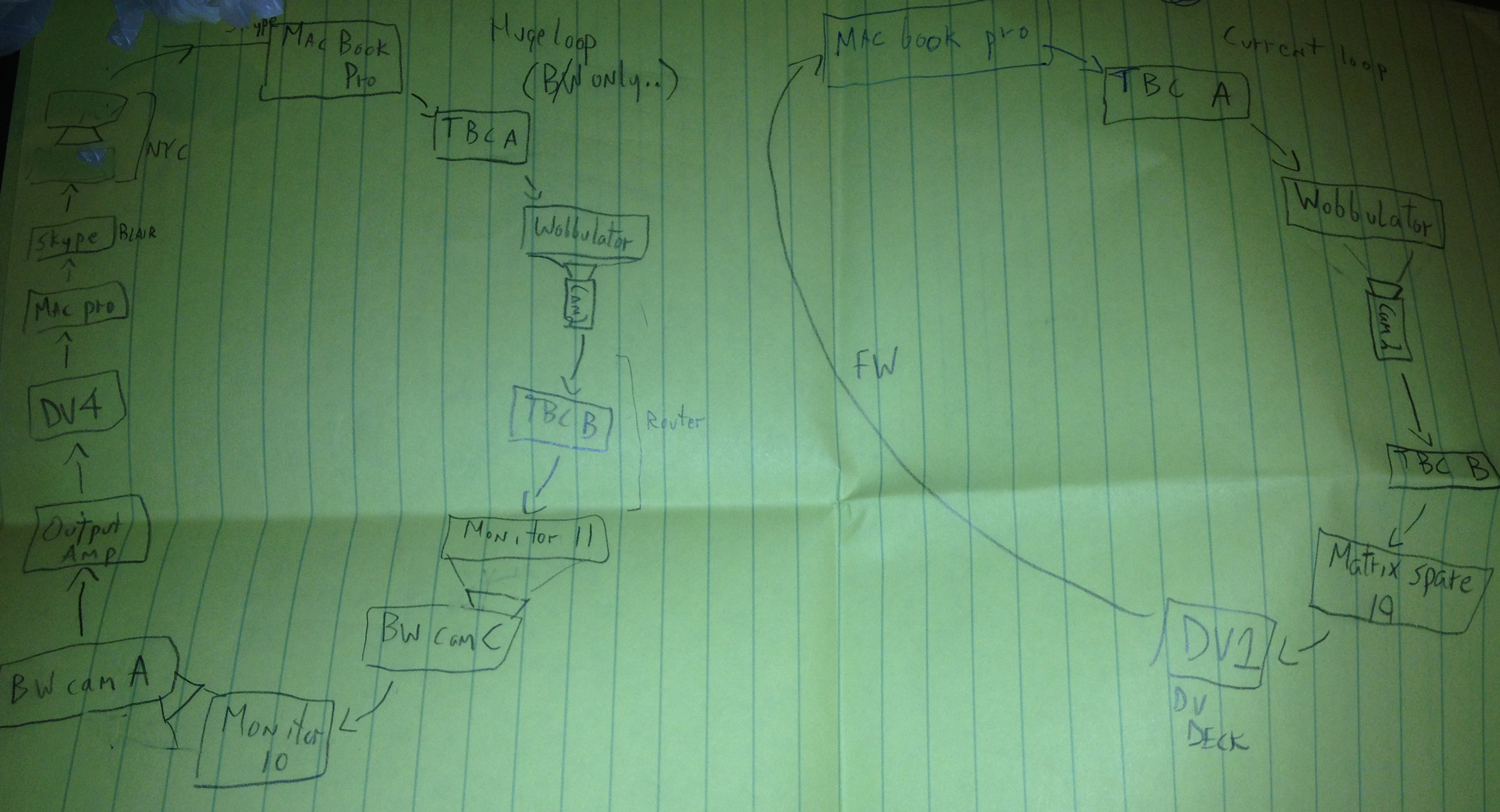
    The eventual output of a large feedback loop ended up not looking the best because the setup was a little hacky and ended up losing detail very quickly due to camera auto adjustments and screens being too bright. The actual time delay through the whole system including Skype was still just a few frames. There was also several decades between equipment and a break between color and black & white feeds at certain points. I’ve returned to the idea a few times and I’ve wanted to push it a little further.

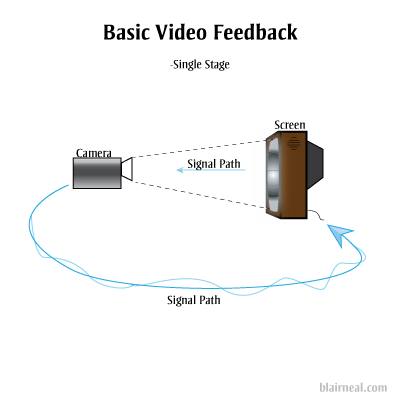
    As a refresher, this is the most basic form of optical feedback, just a camera plugged into a screen that it is capturing.

    Feedback-1-stage

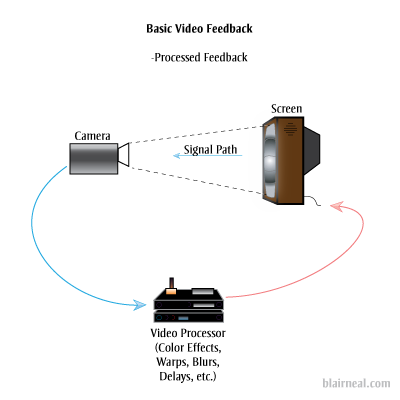
    You can also add in additional processors into the chain that can effect the image quality (delays, blurs, color shifts, etc). Each of these effects will be amplified as they pass through the loop.

    Processed_feedback


    The above are the most common and straightforward techniques of optical feedback. They will generate most of the same feedback effects as the larger systems I’m proposing, generally with a shorter delay and less degradation. Doesn’t hurt to ask about what will happen if we add another stage to the feedback system:

    Dual-stage-feedback

    We’ll lose a little more image quality now that the original photons have been passed through twice as many pieces of glass and electronics. Let’s keep passing those photons around through more stages. You could put a blinking LED in front of one of the screens and have it send it’s photons through all the subsequent screens as they transform digitally, and electrically. The LED’s light would arrive behind it in some warped, barely perceivable fashion but it would really just be a sort of ghost of the original photons.

    6-stage-feedback

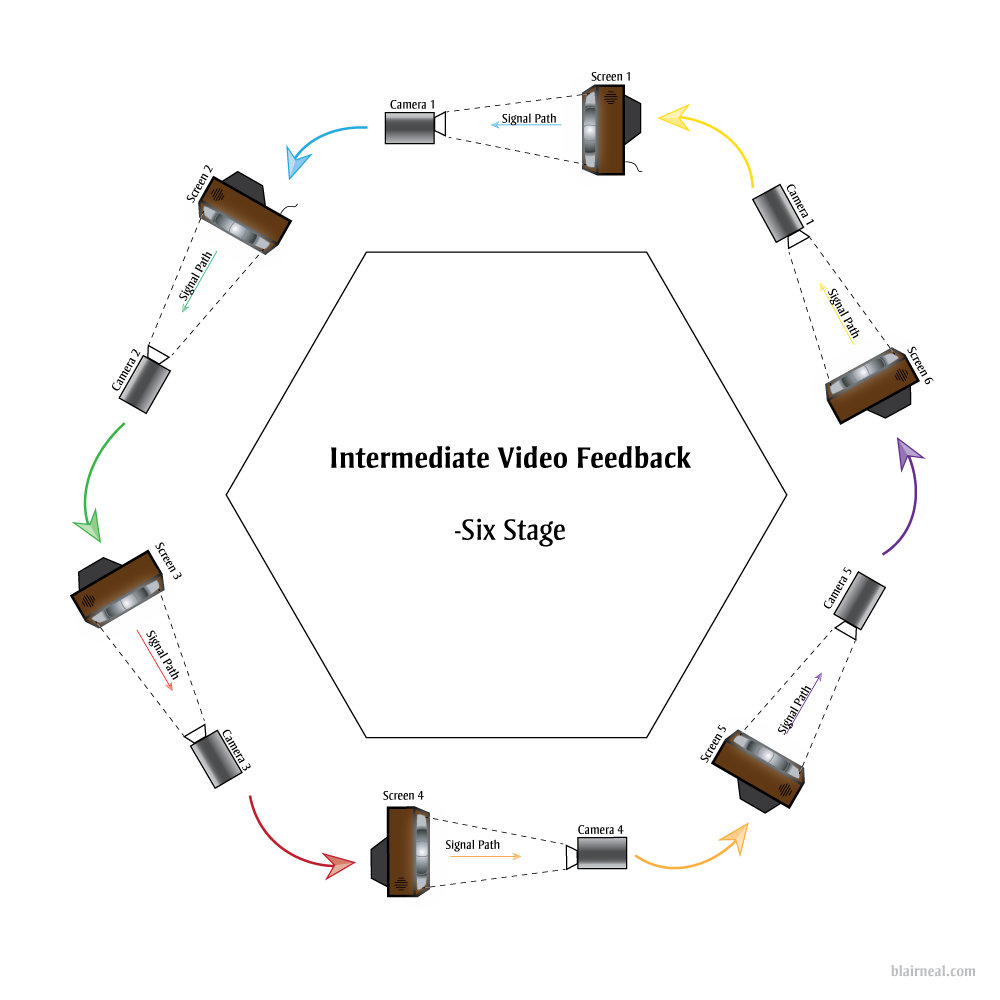
    We can take the above example of a 6 stage video feedback loop and start working out what we might need to hit as many image and screen technologies as we can think of from the past 50 years. Video art’s Large Hadron Collider.

    Click for detail

    6-stage-feedback_example

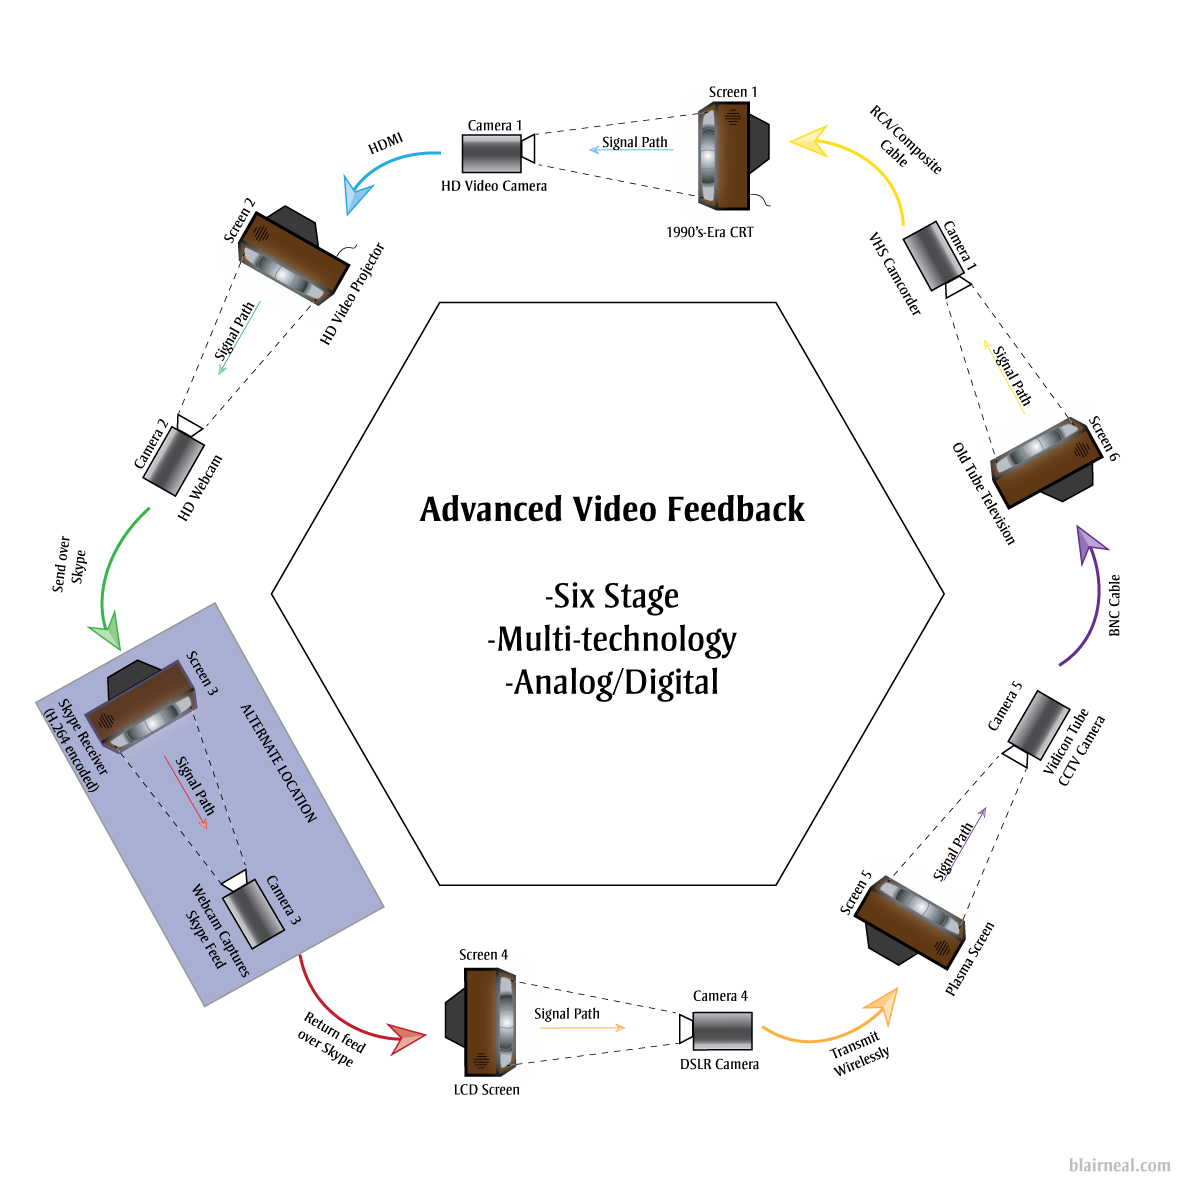
    By hitting so many kinds of video processing methods we would get a video output that would be just a little delayed, and would create some interesting effects at certain points in the chain. By varying camera resolutions, camera capture methods, and analog versus digital technologies, we can bounce the same basic signal through all of these different sensor and cable types. The signal would become digital and analog at many different stages depending on the final technologies chosen. The digital form of the signal would have to squeeze and stretch to become analog again. The analog signal would need to be sampled, chopped and encoded into its digital form. Each of these stages would have their own conversions happening between:

    • Video standards/Compressions (NTSC, PAL, H.264, DV, etc.)
    • Resolutions/Drawing methods (1080p, 480p, 525 TV Lines)
    • Voltages
    • Refresh Rates
    • Scan methods (CMOS, CCD, Vidicon Tube)
    • Illumination methods (LED, Fluorescent Backlight, CRT)
    • Wire types
    • Pixel types
    • Physical Transforms. (Passing through glass lenses, screens) etc etc

    By adding in broadcast and streaming technologies like Skype, we can extend the feedback loop not only locally within one area, but also globally. One section of the chain can be sent across the globe to another studio running a similar setup with multiple technologies. This can continue being sent around to more and more stations as long as the end is always sent back to the first monitor in the chain.

    A digital feedback or video processing step could also be added where several chains of digital feedback occur as well.

    If you were able to create a system large enough, there could be so much processing happening for the signal itself to become delayed for a few seconds before it reaches the “original” start location. In this large system, you could wave your hand in between a monitor and camera, and get a warped “response” back from yourself a second or two later.

    It’s interesting for me to consider what the signal would be at this point, after going through so many conversions and transforms. Is the signal a discrete moment as it passes from monitor to screen, or does it somehow keep some inherent properties as it fires around the ring?

    Suggested Links:

    http://softology.com.au/videofeedback/videofeedback.htm

  • Guide to Camera Types for Interactive Installations

    I just published an epic article over on Creative Applications detailing the use of different kinds of cameras in interactive installations. Check it out, and add any additional tips in the comments there!:

    http://www.creativeapplications.net/tutorials/guide-to-camera-types-for-interactive-installations/

  • Painterly Jitter

    (Click for  versions in their full 640 x 480 glory)Playing around with old code, feedback loops and Andrew Benson’s always fun optical flow shaders. Sometimes stills of unusual systems are nicer than the thing in motion…

  • Projection abstraction #1

    Projection Abstraction #1 from blair neal on Vimeo.

    Playing with a laser pico projector, quartz composer, and some colored gels

  • Top Music Videos of 2011

    (no particular order)

    Bon Iver – Calgary (really awesome environment..love the reveal at the end)

    Battles – My Machines (amazingly done single shot video)

    Hooray For Earth – True Loves (this needs to be made into a movie)

    No Age – Fever Dreaming (another good single shot video)

    Battles – Ice Cream (all over the place, but the styling is pretty great)

    Adele – Rolling in the Deep (some of the shots are really incredible)

    Swedish House Mafia – Save the world (what a simple idea..but brilliant)

    Oh what the hell:
    Katy Perry – TGIF

  • Demo Reel 2011

    I finally put together a demo reel of a bunch of my previous work, most of which you can find in the rest of my portfolio. It includes some of my live visuals work, some of my interactive installation work, and a few of my music videos (both official and unofficial). I’ll be adding onto it eventually. All of the material on the reel was shot, edited, programmed, and tweaked by me.

  • The Wobbulator

    I was finally able to cobble together a video for Nam June Paik’s Wobbulator. It was one of my favorite pieces of equipment during my residency at the Experimental Television Center, and I was confused about why there wasn’t a lot of information out there about it on the web. There are a few grainy youtube videos but they don’t show a lot of the exterior of the device or any of the real time manipulations, so I wanted to make a little educational video. Most of the Wobbulator’s source images in this video were either from a camera pointed out a window, or just from straight video feedback.

    For a lot more information, check out the Experimental Television Center’s website in their Video History Project area. There are tons of great articles on early analog video tools and techniques, but in particular there is a very detailed article on the wobbulator. Just to give you some more info, here is the first paragraph of the article on the device:

    A raster manipulation unit or ‘wobbulator’ is a prepared television which permits a wide variety of treatments to be performed on video images; this is accomplished by the addition of extra yokes to a conventional black and white receiver and by the application of signals derived from audio or function generators on the yokes. The unit is a receiver modified for monitor capability; all of the distortions can thus be performed either on broadcast signals or, when the unit is used as a monitor, on images from a live or prerecorded source. Although the image manipulations cannot be recorded directly, they can be recorded by using an optical interface. The patterns displayed on the unit are rescanned; a camera is pointed directly at the picture tube surface and scans the display. The video signal from this rescan camera is then input to a videotape recorder for immediate recording or to a processing system for further image treatment. The notion of prepared television has been investigated by a number of video artists and engineers; this particular set of modifications was popularized by Nam June Paik.

    I also made a quick music video with the wobbulator as a key component…check it out here

    For more on my experience at the experimental television center check out a few of these links
    [1] [2] [3] [4]

    This video is now featured on Rhizome, Create Digital Motion, Hack a day, Makezine, Wired and Notcot among others

  • The first of videos from the ETC

    The first of 4 or 5 videos that I churned out at my residency at the experimental television center. Both of these were made on my last day there…they mostly came about because the song would randomly come on while i was working and it just happened to click with what I was doing at the moment. Both are kind of slow burn and minimalist. Enjoy!

    I’ll just copy and paste from my vimeo:

    An experimental video made while in residency at the Experimental Television Center in Owego, NY. This song happened to come on randomly as I was working with a set of cameras, and this is what I ended up with.

    The entire video was (sort of) made in one shot. I set up 4 cameras pointed at different parts of the scene, and used audio triggers from the song to automatically switch between the cameras. All camera switches were unique to the time I played the song back, so I couldn’t really plan for a progression.

    The first pass was recorded off of the screen of the wobbulator to give it a security camera feel. i then played back that first pass back through the wobbulator again and had the audio drive the drawing of the scanlines, resulting in the jiggling lines of the video. You’ll notice that bass sounds result in an all over image wobble, while high notes are more visual as you can see their frequency in the lines.

    And another:

    Part of an experiment with multiple cameras and rapid switching at the Experimental Television center. Attempt at making a live lo-fi bullet time/stop motion look.

    This video was all done live and in one take using 8 different cameras and an automated switcher. Some layering and color correction was done in Final Cut Pro afterwards. I mostly left it in gritty SD because it was already the product of 8 cameras, 4 of which were late 70’s/early 80’s black and white cameras. Everything was then run through the Jones sequencer which was controlled by an oscillator running at a variable speed.

    The colors are off because when something is run through the ETC system, it’s chroma phase gets thrown off by each new device it goes through. I tried to do as much manual correction of the hue as I could, but I ended up leaving it in all different colors to differentiate the cameras a little bit.